Quick Answer
Having the right tools for changing a tyre makes all the difference. It transforms a stressful roadside emergency into a manageable task. You will be able to quickly and safely replace a flat tyre with your spare. This guide details the essential tools, ensuring you’re ready for any roadside emergency. For a more comprehensive overview of the entire process, refer to our complete guide to changing a tyre.
Why Using the Right Tools Matters
Using proper tools is crucial for your safety. They help prevent injuries during a tyre change. Furthermore, correct tools make the process much faster. They also ensure the spare tyre is securely fitted. This preparation gives you peace of mind on the road. It ensures a temporary fix is reliable until you reach a service center. Without the right equipment, even a simple flat tyre can become a dangerous ordeal.
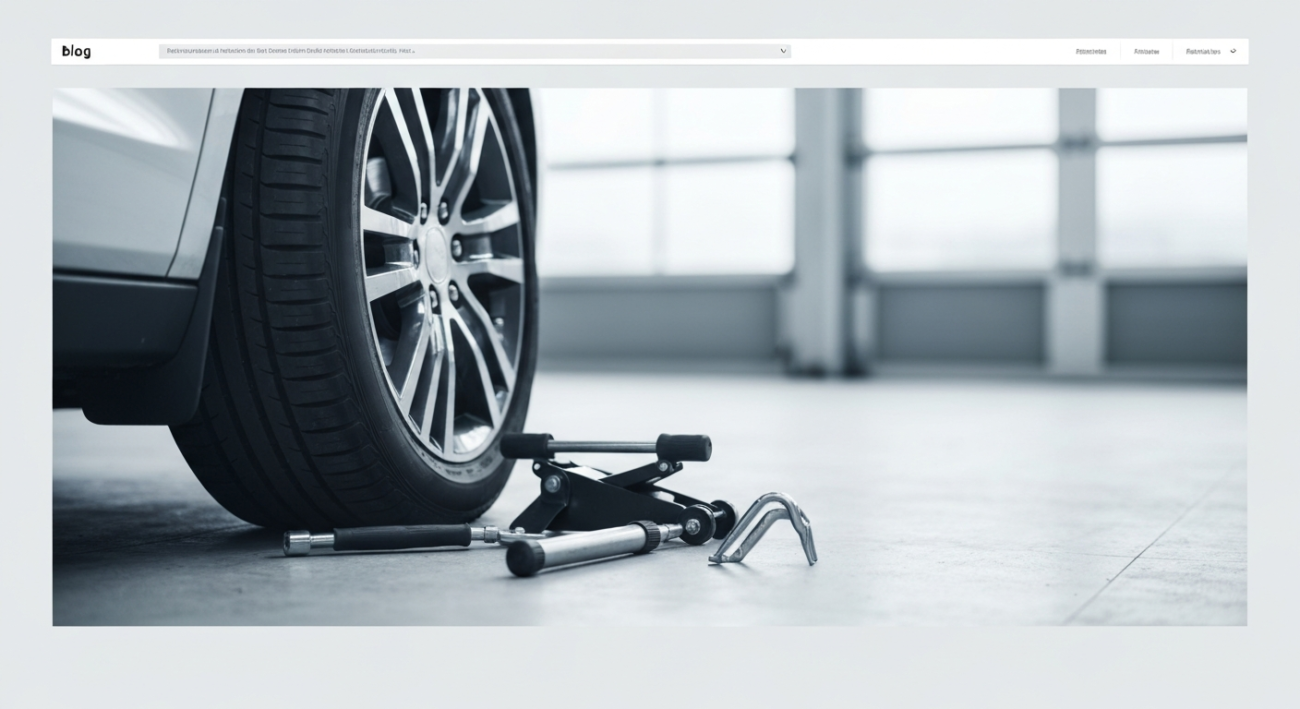
Gathering Your tools for changing a tyre
- Spare tyre (fully inflated and in good condition)
- Vehicle owner’s manual (for specific instructions)
- Jack (usually found in your boot, specific to your car model)
- Lug wrench (for loosening and tightening wheel nuts)
- Wheel chocks or sturdy bricks (to prevent rolling)
- Work gloves (to protect your hands)
- Flashlight or headlamp (for night or low-light conditions)
- Warning triangle or flares (for roadside visibility)
- Tyre pressure gauge (to check spare tyre pressure)
- Small piece of wood or sturdy mat (for soft ground under the jack)
Step-by-Step Instructions
Step 1: Ensure Safety First
Safety is your top priority. Pull your vehicle over to a safe, level spot away from traffic. Turn on your hazard lights immediately. Engage the parking brake firmly. If you have them, place your warning triangle or flares behind your car. This alerts other drivers to your presence. Never attempt a tyre change on a sloped or unstable surface. You must protect yourself and your vehicle.
Step 2: Locate and Prepare Your Tools
Gather all your essential tools. Most vehicles store the spare tyre and tools in the boot. Check your owner’s manual for exact locations. Ensure your spare tyre is correctly inflated and in good condition. You need to verify it’s roadworthy. Knowing when to change a tyre is crucial for safety and preparedness. Lay out your tools within easy reach. This prevents fumbling during the process.
Step 3: Loosen Lug Nuts
Before lifting the vehicle, loosen the lug nuts on the flat tyre. Use your lug wrench. Turn the wrench counter-clockwise. You may need to use significant force. If they are very tight, you can carefully use your foot on the wrench. However, never stand or jump on the wrench. Only loosen them about a quarter to half a turn. Do not remove them completely at this stage. This initial loosening prevents the wheel from spinning once it’s off the ground.
Step 4: Jack Up the Vehicle
Consult your owner’s manual for the correct jack points. Improper placement can damage your car or cause the jack to slip. Position the jack securely under the vehicle frame, near the flat tyre. If the ground is soft, place a sturdy mat or small piece of wood under the jack. Raise the vehicle slowly. Lift it just enough so the flat tyre clears the ground. Ensure the car remains stable throughout this process.
Step 5: Remove Flat Tyre
Now that the vehicle is elevated, you can fully remove the lug nuts. Turn them counter-clockwise until they come off. Place them in a safe spot, like your hubcap, to prevent losing them. Carefully grip the flat tyre with both hands. Pull it straight off the wheel studs. It might be heavy, so be ready to support its weight. Place the flat tyre flat on the ground, out of the way. It can also serve as an extra safety block under the car frame.
Step 6: Install Spare Tyre
Take your spare tyre and align its bolt holes with the wheel studs. Carefully push the spare tyre onto the hub. Ensure it sits flush against the brake rotor. Once aligned, hand-tighten the lug nuts. Turn them clockwise until they are snug. Do this in a star or crisscross pattern. This helps to properly center the wheel. Do not overtighten them yet; just make sure they are finger-tight.
Step 7: Lower Vehicle and Tighten Nuts
Use the jack to slowly lower the vehicle until the spare tyre lightly touches the ground. The weight of the car will help keep the wheel from turning. Now, use your lug wrench to tighten the lug nuts properly. Again, use the star or crisscross pattern. Tighten them as much as you can by hand. Lower the vehicle completely to the ground. Remove the jack. Give the lug nuts one final, firm tighten. Make sure they are secure.
Step 8: Stow Tools and Flat Tyre
Gather all your tools. Store them back in their designated places in the vehicle. This includes the jack, lug wrench, and wheel chocks. Secure the flat tyre in the boot. You might place it where the spare tyre normally sits. Ensure everything is properly stowed away. Loose items can become hazards during driving. Keeping your car organized is important for safety.
Step 9: Check Tyre Pressure and Drive Safely
Immediately check the pressure of your newly installed spare tyre. Use your tyre pressure gauge. Spare tyres often have different recommended pressures than full-size tyres. Drive cautiously to the nearest service center or garage. Spare tyres are usually temporary solutions. They are not designed for long distances or high speeds. Get your flat tyre repaired or replaced as soon as possible. Also, have the spare tyre checked by a professional.
Common Mistakes When Using tools for changing a tyre
- Not checking the spare tyre’s pressure or condition beforehand.
- Failing to use wheel chocks, allowing the vehicle to roll.
- Improperly placing the jack, leading to instability or vehicle damage.
- Overtightening lug nuts, making them difficult to remove later.
- Leaving tools or the flat tyre unsecured in the vehicle.
- Attempting a tyre change on uneven or soft ground.
- Forgetting to engage the parking brake before starting.
- Ignoring the vehicle’s owner’s manual for specific instructions.
If Something Doesn’t Work
Lug nuts are too tight to loosen.
Try using your body weight. Push down firmly on the lug wrench. A rubber mallet can sometimes help. You can also use a penetrating oil like WD-40. Let it soak for a few minutes. Always ensure you are turning counter-clockwise.
The jack seems to be slipping.
Stop immediately. Lower the vehicle slightly if safe. Re-position the jack. Ensure it is on a completely firm and level surface. Verify it is engaging the correct jack point as specified in your owner’s manual. Add a sturdy base if the ground is soft.
The spare tyre won’t fit onto the wheel studs.
Check if the tyre is correctly aligned. The bolt holes must match the studs. Wiggle the tyre gently. Lift it slightly if needed. Make sure no rust or debris is preventing it from sliding on. Sometimes, a little rotation helps align the holes.
The lug nuts keep loosening after driving a short distance.
This is very dangerous. Immediately pull over to a safe location. Re-tighten all lug nuts in a star pattern. You might not have tightened them enough initially. Get to a service center as soon as possible for a professional check. They can ensure proper torque.
Expected Result
You will have successfully installed your spare tyre. This temporary fix allows you to drive safely. Your immediate goal is to reach a professional service center. There, you can have your flat tyre repaired or replaced. Moreover, you will gain confidence. This prepares you for future roadside emergencies. You will feel empowered by your ability to handle unexpected situations.
Quick Summary
Mastering a tyre change requires the right equipment. Knowing how to use these tools is equally important. This guide has outlined every essential item. It has also provided a clear, step-by-step process. Being prepared can save you time and stress. Always keep your tools in good condition. You will be ready for anything the road throws your way.