Quick Answer
Prioritizing safety precautions changing a tyre is always paramount. Should you experience a flat, your immediate action is to find a secure, level pull-off area. Once stopped, activate your hazard lights to warn others. Engage the parking brake firmly. Place wheel chocks behind the wheels that will remain on the ground. Then, assemble all necessary tools. These initial measures create a safe environment, significantly reducing risks before any work begins on the tyre itself. Following them ensures both your protection and that of other road users.
Why These Safety Measures Are Crucial
Implementing these safety measures is not optional; it is essential. They prevent serious accidents. This protects not only yourself but also any passengers and other drivers nearby. Even a seemingly simple task like a tyre change carries risks. A few minutes spent on preparation can save lives. These steps transform a potentially dangerous roadside emergency into a controlled, manageable situation. Ultimately, ensuring your well-being is the primary goal of every precaution taken.
What You Need for a Safe Tyre Change
- Spare tyre (inflated and correct size)
- Vehicle owner’s manual
- Jack
- Lug wrench
- Wheel chocks or bricks
- Reflective triangle or flares
- Work gloves
- Torch or headlamp (for night time)
- High-visibility vest (optional but recommended)
Step-by-Step Safety Precautions for Changing a Tyre
Step 1: Find a Safe, Level Spot
The selection of your changing location is critical. Immediately after realizing you have a flat tyre, try to guide your vehicle to a safe spot. This means getting completely off the main roadway if at all possible. Look for a flat, firm, and stable surface, such as a paved shoulder or parking lot. Avoid any soft ground, uneven terrain, or steep inclines. A level surface prevents the car from potentially rolling or slipping off the jack, which is a major safety hazard. For a comprehensive overview of the entire process, consult this complete guide on changing a tyre. Taking these first few moments to secure a proper location sets the foundation for a safe tyre change.
Step 2: Secure the Car and Increase Visibility
Once you are in a safe location, securing your vehicle is the next vital step. Engage your parking brake as firmly as possible. If your car has an automatic transmission, shift it into ‘Park’. For manual transmission vehicles, select either first or reverse gear. This additional security prevents any accidental movement of the car. Next, place wheel chocks, bricks, or heavy rocks behind and in front of the wheel diagonally opposite the flat tyre. For instance, if your front left tyre is flat, chock the rear right wheel. This prevents the car from rolling. Furthermore, immediately activate your vehicle’s hazard warning lights. If you have reflective triangles or road flares, deploy them a safe distance behind your vehicle. These safety precautions changing a tyre are essential. They greatly increase your visibility to passing traffic, protecting you and anyone assisting you.
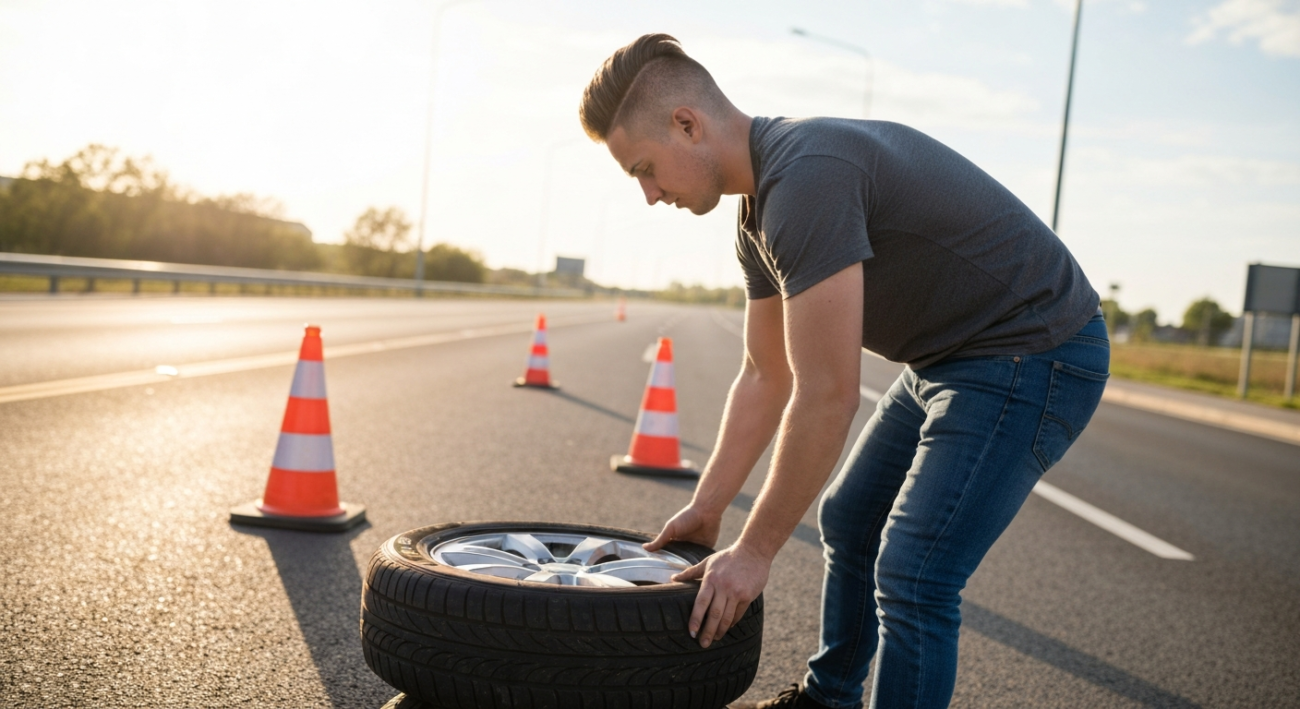
Step 3: Gather Essential Tools and Gear
Before you begin any physical work, ensure you have all necessary equipment close at hand. This includes your fully inflated spare tyre, the vehicle jack, and the lug wrench. Locate these items, typically found in your boot or under the rear of the vehicle. For personal protection, put on a pair of sturdy work gloves. These will protect your hands from grease, sharp edges, and potential injury. If working at night or in low light, a torch or headlamp is indispensable for clear visibility. Consider wearing a high-visibility vest; it significantly enhances your presence to other drivers. Having your tools and protective gear ready beforehand minimizes fumbling and keeps your focus on the task. For a detailed rundown of every item you’ll need, refer to this guide to essential tools for changing a tyre.
Step 4: Loosen the Lug Nuts
The next step is to loosen the lug nuts while the vehicle is still firmly on the ground. Use the lug wrench provided with your vehicle. Fit the wrench onto each lug nut. Turn them counter-clockwise to break their initial tightness. You might need to apply significant force. If a nut is particularly stubborn, try using your foot on the wrench handle, but do so carefully. Only loosen them about a quarter to half a turn. Do not remove them completely yet. This initial loosening is much safer when the car is stable. It prevents the wheel from spinning or the car from moving when leverage is applied. This method also reduces the risk of the car falling from the jack later.
Step 5: Position the Jack Correctly and Lift
Correct jack placement is non-negotiable for safety. Always consult your vehicle’s owner’s manual to identify the specific jack points. These are reinforced areas on the car’s frame, designed to withstand the vehicle’s weight. Using an incorrect point can damage your car or, more critically, cause the jack to slip. Position the jack firmly and squarely under the designated jack point, near the flat tyre. Ensure it is on a stable, level part of the ground. Begin to slowly raise the vehicle using the jack. Lift it just enough so that the flat tyre is completely off the ground and can spin freely. Never, under any circumstances, place any part of your body underneath the vehicle when it is supported solely by a jack. For comprehensive guidance on safely lifting your vehicle, consult how to jack up a car effectively and securely.
Step 6: Remove the Lug Nuts and Flat Tyre
With the car safely elevated, you can now fully remove the lug nuts. Continue turning them counter-clockwise by hand until they are completely off. Keep all lug nuts together in a secure place, like a hubcap or a small container, to prevent losing them. Once all nuts are removed, grasp the flat tyre firmly with both hands. Gently pull it straight off the wheel hub. It might require a slight wiggle or careful rocking motion to free it, especially if it’s been on for a long time. Tyres can be surprisingly heavy, so be prepared. As an added layer of safety, slide the removed flat tyre underneath the car frame, directly next to the jack. If the jack were to fail unexpectedly, the tyre could provide a small, temporary buffer, preventing the car from crashing fully to the ground.
Step 7: Mount the Spare Tyre
Now it’s time to install your spare tyre. Carefully lift the spare and align its bolt holes with the wheel studs on the hub. Push the spare tyre onto the studs until it sits flush against the hub. Ensure it’s properly seated. Once in place, take the lug nuts you set aside. Thread each lug nut onto its respective stud by hand. Turn them clockwise until they are finger-tight. It’s crucial not to use the lug wrench for this initial tightening. Hand-tightening ensures that the nuts are not cross-threaded, which can cause significant damage. Just make sure they are snug enough to hold the wheel in place securely for the next step.
Step 8: Lower the Car and Fully Tighten Lug Nuts
With the spare tyre in place and the lug nuts hand-tight, slowly lower the vehicle using the jack. Bring the tyre down until it just makes contact with the ground. At this point, the car’s weight will prevent the wheel from spinning as you apply more force. Use your lug wrench to fully tighten all the lug nuts. It is important to tighten them in a star or criss-cross pattern. For a five-lug wheel, tighten one, then the one opposite it, and so on. This method ensures even pressure distribution across the wheel. It prevents the wheel from becoming warped or improperly seated. Once all nuts are very snug, you can lower the car completely and remove the jack. Give the nuts one final check for tightness.
Step 9: Perform Post-Change Checks
After your tyre change is complete, perform a few critical final checks. Double-check that all lug nuts are securely tightened. There should be no wobble or looseness. Store your flat tyre, jack, lug wrench, and any other tools safely back in your vehicle. Make sure they are not loose items that could become projectiles in an emergency stop. If possible, use a tyre pressure gauge to check the inflation of your newly installed spare tyre. Spare tyres often lose pressure over time. Drive cautiously and at a reduced speed, as most spare ‘donut’ tyres are not designed for high speeds or long distances. Head directly to the nearest service station. Get your original tyre inspected and repaired or replaced. Also, have the pressure of your spare tyre checked professionally. This ensures long-term safety and preparedness for your next journey.
Common Safety Mistakes to Avoid
- Not parking on a level surface
- Failing to use hazard lights or safety markers
- Not applying the parking brake or blocking wheels
- Jacking the car on an incorrect or unstable point
- Working under a car supported only by a jack
- Overtightening lug nuts unevenly
- Driving too fast on a spare or ‘donut’ tyre
- Forgetting to check spare tyre pressure
If Something Doesn’t Work
Lug nuts are too tight to loosen.
Try using your body weight on the lug wrench for more leverage. Ensure the wrench is properly seated. Avoid jumping on it, as this can damage the wrench or nuts.
The car feels unstable on the jack.
Immediately lower the vehicle. Re-assess your parking spot. Ensure it is flat and firm. Verify the jack is placed correctly on a reinforced point. Do not proceed until stability is assured.
Spare tyre doesn’t fit or is flat.
Call roadside assistance immediately. Never attempt to drive on an uninflated or incorrect spare. Always check spare tyre pressure regularly as part of routine maintenance.
Tyre won’t come off the hub.
It might be stuck due to rust or corrosion. After removing lug nuts, try kicking the tyre from the side. Use controlled force. This usually helps break it free.
What Success Looks Like
A successfully changed tyre means your vehicle is safely back on the road. The spare tyre is properly secured. You have replaced the flat tyre with minimal risk. Your focus was on personal safety throughout the process. You are now ready to drive to a professional for further assistance.
Quick Summary of Safety Steps
Remember, prioritize your safety above all when changing a tyre. Always find a safe location and secure your vehicle. Use the right tools and follow each step carefully. These precautions ensure a smooth and safe experience. You can handle this roadside challenge effectively.