Quick Guide to Better Brakes
Learning how to bleed brakes at home can significantly improve your car’s stopping performance. This process removes air bubbles from your brake lines, giving you a firmer, more responsive pedal. You’ll need a few basic tools and a helper, but the result is a safer, more reliable braking system and a great sense of accomplishment.
Why Bleeding Your Brakes Matters
Air in your brake lines compresses under pressure, leading to a spongy brake pedal feel. By pushing old fluid and air out and replacing it with new, clean fluid, you restore proper hydraulic pressure. This makes your brakes more effective and ensures consistent stopping power, which is critical for your safety on the road.
What You’ll Need Before You Begin
- New, correct type of brake fluid (check your car’s manual)
- Combination wrenches (typically 8mm, 10mm, or 12mm)
- Clear plastic tubing (3/16-inch or 1/4-inch diameter)
- Empty clear plastic bottle or jar
- A friend or helper to operate the brake pedal
- Jack and jack stands (or a car lift for easier access)
- Wheel chocks for safety
- Safety glasses and work gloves
- Clean rags or shop towels
- Turkey baster (optional, for master cylinder cleanup)
Detailed Steps on How to Bleed Brakes
Step 1: Prepare Your Vehicle to Bleed Brakes
Park your car on a level surface, engage the parking brake, and place wheel chocks behind the wheels you aren’t working on. Understanding basic vehicle maintenance, like this process, is key to keeping your car running smoothly; for more general tips, check out this related post on car maintenance basics. Loosen the lug nuts on the wheels you’ll be removing, then lift the car safely with a jack and secure it with jack stands. Remove the wheels to access the brake calipers. Open the hood and locate the brake fluid reservoir. Use a turkey baster to remove most of the old, dark fluid, leaving just enough to prevent air from entering the system. Then, refill the reservoir with fresh, new brake fluid.
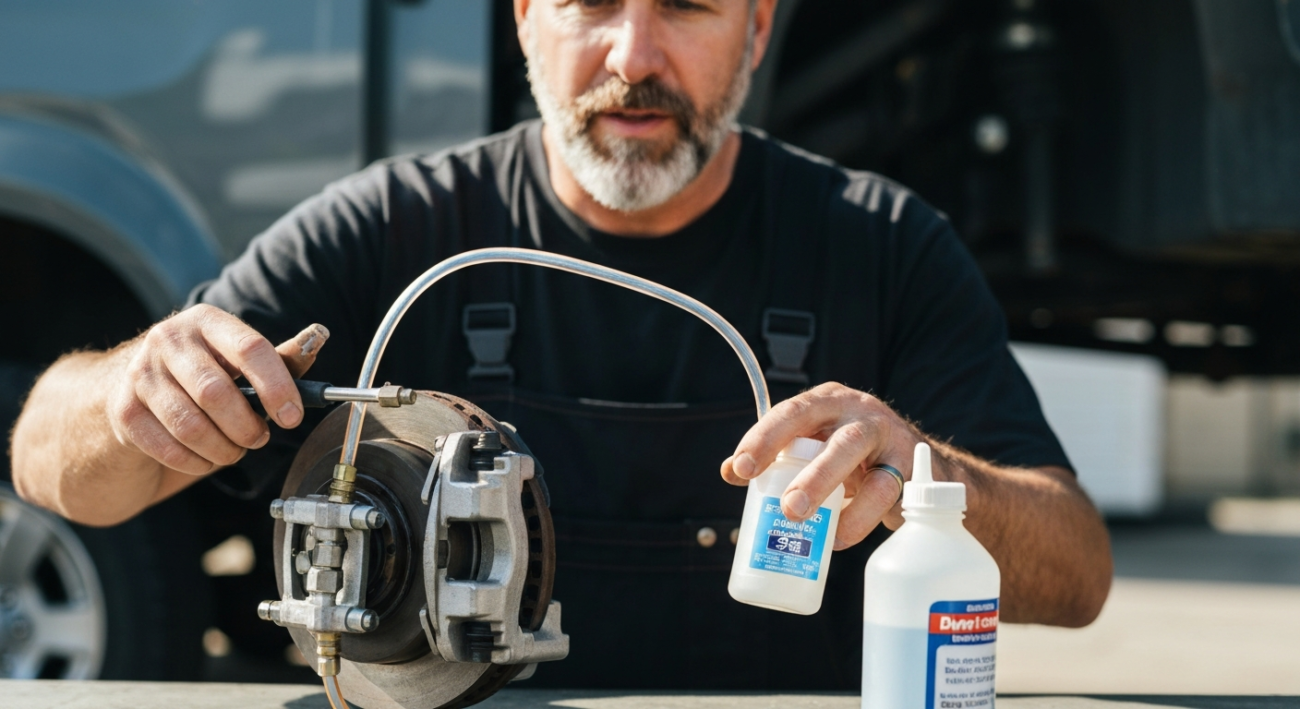
Step 2: Connect Bleeder Kit and Locate Bleeder Screw
Start with the wheel furthest from the master cylinder (typically the passenger rear). Locate the bleeder screw on the brake caliper; it looks like a small nipple. Fit one end of your clear plastic tubing securely over the bleeder screw. Place the other end of the tubing into an empty, clear bottle that is partially filled with new brake fluid. This setup creates a one-way valve, preventing air from being sucked back into the system during the process.
Step 3: Perform the Two-Person Bleeding Process
Have your helper get into the driver’s seat. Instruct them to press the brake pedal firmly and hold it down. While they maintain constant pressure on the pedal, use your wrench to loosen the bleeder screw about a quarter to half a turn. You’ll observe old brake fluid, possibly mixed with air bubbles, flowing into the clear bottle. Crucially, tighten the bleeder screw *before* your helper releases the brake pedal. This prevents air from re-entering the brake line.
Step 4: Repeat Until Fluid Runs Clear
Repeat step 3 several times for the same wheel. Make sure your helper keeps the pedal pressed until the bleeder screw is tightened. Continuously monitor the brake fluid level in the master cylinder reservoir under the hood. Never let it drop too low, or you’ll introduce air into the system and potentially have to start over. Keep adding fresh brake fluid as needed. You’ll know you’re done with that wheel when the fluid flowing into the bottle is consistently clean, clear, and free of any air bubbles.
Step 5: Final Steps to Bleed Brakes Completely
Move to the next furthest wheel (usually the driver’s rear), then the passenger front, and finally the driver’s front. Follow the exact same procedure for each wheel, always starting with a full master cylinder and ensuring the bleeder screw is tightened before the pedal is released. Once all wheels are bled, double-check that all bleeder screws are securely tightened. Put the wheels back on, lower the car, and tighten the lug nuts to the manufacturer’s specifications. Have your helper pump the brake pedal a few times and hold it. The pedal should now feel firm and not spongy, indicating a successful job on how to bleed brakes.
Common Mistakes to Avoid When Bleeding Brakes
- Letting the master cylinder reservoir run dry, which introduces more air into the system.
- Not tightening the bleeder screw *before* the brake pedal is released, causing air to be sucked back in.
- Bleeding the wheels in the incorrect order (always furthest to closest from the master cylinder).
- Using old, contaminated, or the wrong type of brake fluid for your vehicle.
- Failing to clean up spilled brake fluid promptly, as it can damage your car’s paint and other components.
If Something Doesn’t Work
Brake pedal still feels spongy after bleeding all wheels.
You likely still have air trapped in the system. Re-bleed all four wheels carefully, paying close attention to ensuring the master cylinder never runs dry and that the bleeder screw is tightened before the pedal is released. Check all brake line connections for any leaks that might be introducing air.
No fluid comes out when the bleeder screw is opened.
The bleeder screw might be clogged with debris. Try carefully removing it and cleaning the opening. Ensure your helper is pressing the brake pedal firmly and consistently. In rare cases, there might be a blockage in the brake line itself, which would require professional inspection.
Fluid comes out but still looks dirty or dark after several repetitions.
This indicates that your brake system was heavily contaminated with old fluid. Simply continue the bleeding process for that wheel until the fluid runs consistently clear and clean. You may need to use more new brake fluid than anticipated to flush out all the old, dirty fluid.
Enjoy Your Newfound Stopping Power
After successfully bleeding your brakes, you should immediately notice a significant improvement in pedal feel. The brake pedal will be firm and responsive, no longer feeling soft or spongy. This means your hydraulic system is free of air, and your brakes are working efficiently, providing reliable and safe stopping power for all your drives. Take a short, careful test drive in a safe, controlled area to confirm the improved performance.
Quick Recap: Mastering Your Brakes
Bleeding your brakes is a vital maintenance task that ensures your vehicle’s safety and performance. By following these step-by-step instructions for how to bleed brakes, you can effectively remove air from the system, replace old fluid, and restore a firm, responsive brake pedal. It’s a hands-on job that saves money and gives you confidence in your car’s stopping ability, making every drive safer.