Whip Up Perfect Cream Every Time
Dreaming of light, airy, and utterly delicious whipped cream? Skip the store-bought aerosols and discover how to make whipped cream from scratch. It’s surprisingly simple, takes just a few minutes, and tastes infinitely better. This guide will walk you through everything you need to know to achieve fluffy, stable peaks that will elevate any dessert or drink. Get ready to impress yourself and your guests with this fresh, delightful topping!
Why Homemade Whipped Cream is Best
There’s a significant difference between homemade whipped cream and its store-bought counterparts. The fresh version boasts a superior taste and texture that simply can’t be matched by products filled with stabilizers and artificial flavors. When you learn how to make whipped cream yourself, you gain complete control over the ingredients. You can adjust the sweetness level to your preference, use high-quality vanilla extract for a richer flavor, or even experiment with other extracts. This pure, simple approach results in a cloud-like topping that melts beautifully in your mouth, offering a luxurious finish to pies, cakes, fruits, and hot beverages. It’s a quick culinary win that adds a touch of elegance to any dish.
Essential Tools and Ingredients
- Heavy cream (also known as whipping cream), very cold (at least 36% milk fat)
- Powdered sugar (confectioners’ sugar)
- Vanilla extract (pure vanilla is recommended for best flavor)
- Large mixing bowl (preferably metal or glass, and chilled)
- Electric mixer (stand mixer with whisk attachment or a hand mixer)
- Whisk (if mixing by hand, though an electric mixer is much easier)
- Rubber spatula
Whipped Cream in a Flash: Overview
- Chill your mixing bowl and whisk attachment for at least 15-20 minutes.
- Pour cold heavy cream into the chilled bowl.
- Add powdered sugar and vanilla extract to the cream.
- Begin whipping on low speed, gradually increasing to medium-high.
- Continue whipping until soft peaks or stiff peaks form, depending on your desired consistency.
- Serve your homemade whipped cream immediately or refrigerate it.
Your Guide to Fluffy Perfection: Step by Step
Step 1: Chill Your Equipment for Success
The secret to perfectly stable whipped cream starts with cold temperatures. Place your large mixing bowl and the whisk attachment (or hand mixer beaters) into the freezer for at least 15 to 20 minutes before you begin. This helps the cream stay cold throughout the whipping process, making it much easier to achieve light, fluffy results. A cold environment prevents the cream from warming up too quickly, which can hinder proper aeration and lead to a runny consistency.
Step 2: Gather and Prepare Your Cold Ingredients
Ensure your heavy cream is very cold, straight from the refrigerator. This is crucial for successful whipping. Measure out your heavy cream, powdered sugar, and vanilla extract. For every cup of heavy cream, a good starting point is 1 to 2 tablespoons of powdered sugar and about 1/2 teaspoon of vanilla extract. Adjust sugar to your taste. Powdered sugar is preferred over granulated sugar because its fine texture dissolves easily, preventing a gritty mouthfeel in your finished whipped cream.
Step 3: Combine Cream, Sugar, and Vanilla
Remove your chilled bowl and whisk from the freezer. Pour the very cold heavy cream into the bowl. Add the measured powdered sugar and vanilla extract directly into the cream. If you add the sugar and vanilla at the beginning, they will incorporate more evenly as the cream begins to thicken. Make sure not to overfill your bowl; cream expands significantly as it whips.
Step 4: Begin the Whipping Process
Attach your whisk to your stand mixer or hold your hand mixer. Start whipping on a low speed to prevent splashing. Once the ingredients are combined and you see a few bubbles forming, gradually increase the speed to medium-high. Keep the mixer moving around the bowl if using a hand mixer to ensure even whipping. You’ll notice the cream start to thicken and become frothy, then slightly opaque.
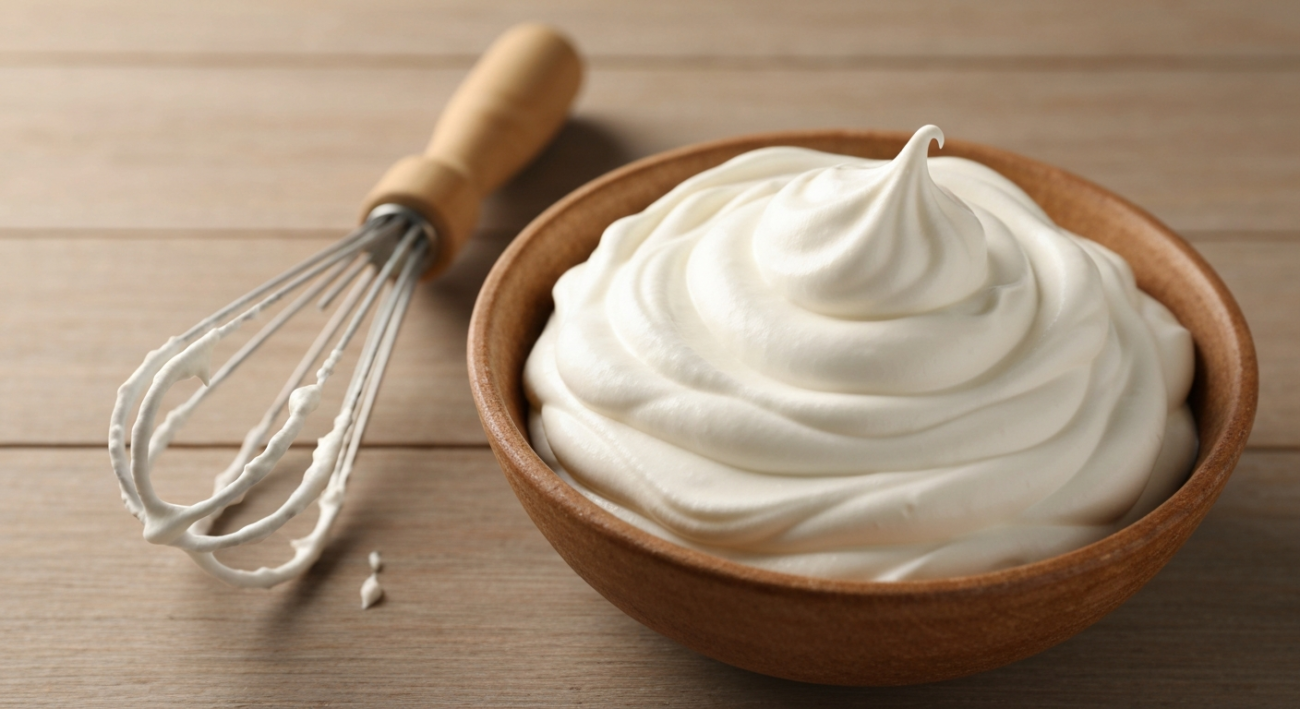
Step 5: Achieve Soft Peaks
As you continue to whip, the cream will thicken further. Stop the mixer occasionally and lift the whisk to check the consistency. Soft peaks form when the cream holds its shape somewhat but still slumps gently when the whisk is lifted. It looks like a gentle curl at the tip of the peak. This consistency is perfect for dolloping onto fruits, pancakes, or for a lighter topping on pies. This is the first stage where your cream is officially whipped.
Step 6: Continue to Stiff Peaks (If Desired)
If you need a more stable whipped cream for piping or a topping that holds its shape firmly, continue whipping beyond soft peaks. Stiff peaks form when the cream stands straight up and holds its shape rigidly when the whisk is lifted. Be very careful at this stage, as it’s easy to over-whip. Keep a close eye on it; the transition from stiff peaks to over-whipped can happen quickly, leading to grainy, curdled cream. Stop as soon as the peaks are firm.
Step 7: Serve Immediately or Store Properly
Your freshly made whipped cream is best served immediately for optimal taste and texture. If you have leftovers or need to prepare it slightly in advance, transfer it to an airtight container. Store it in the refrigerator for up to 2-3 days. If it seems to have deflated slightly after storage, you can briefly re-whisk it by hand for a few seconds to restore some of its fluffiness, but be gentle. Remember, fresh is always best when it comes to homemade whipped cream.
Fixing Common Whipping Woes
My cream isn’t whipping up at all.
The most common culprit is warm cream or warm equipment. Ensure your heavy cream is very cold and that your bowl and whisk have been thoroughly chilled. Also, make sure you are using heavy cream (at least 36% milk fat); low-fat or light cream will not whip properly.
My whipped cream turned grainy or buttery.
You’ve likely over-whipped it. Once cream goes beyond stiff peaks, its fat molecules begin to clump together, separating from the liquid and forming butter. Unfortunately, there’s no way to reverse this process. You’ll need to start fresh with new cream. Pay close attention and stop whipping as soon as your desired peak consistency is reached.
It’s too thin or runny and won’t hold its shape.
This usually means it hasn’t been whipped long enough, or it got too warm during the process. Make sure all your components are cold. If it’s still somewhat liquid, you can continue whipping for a bit longer, checking frequently. For extra stability, ensure your cream is very high in fat, and consider chilling the bowl over an ice bath while you whip.
Avoid These Whipped Cream Blunders
- Using warm cream or warm tools: Always chill your heavy cream, bowl, and whisk. Cold is your best friend when learning how to make whipped cream.
- Adding granulated sugar instead of powdered sugar: Granulated sugar can leave a gritty texture because it doesn’t dissolve as easily as powdered sugar (confectioners’ sugar).
- Over-whipping the cream: Stopping too late can turn your beautiful cream into grainy butter. Always keep a close eye on the consistency.
- Under-whipping the cream: Stopping too early means your cream won’t hold its shape. It needs enough air incorporated to be light and stable.
- Using low-fat cream: Only heavy cream (with at least 36% milk fat) has enough fat content to properly whip and hold its structure.
Expert Pro-Tips
- For extra stability, especially in warm climates or if serving later, add 1/4 teaspoon of cream of tartar or 1 tablespoon of dried milk powder per cup of heavy cream before whipping.
- Experiment with flavorings beyond vanilla. Try almond extract, a touch of citrus zest, cinnamon, or even a tablespoon of your favorite liqueur for adult desserts.
- To keep your cream extra cold during whipping, place your mixing bowl in a larger bowl filled with ice water. This creates an ice bath, ensuring consistent coldness.
- Taste your cream as you whip and adjust the sweetness. Everyone has a different preference, and homemade allows for perfect customization.
- For beautiful presentation, use a piping bag with a decorative tip once your cream reaches stiff peaks. This is great for cakes and cupcakes.
Your Culinary Triumph: Perfect Whipped Cream
After following these steps, you will have successfully created a batch of glorious, homemade whipped cream. It should be light, airy, and hold its shape beautifully, whether you aimed for soft or stiff peaks. The texture will be smooth, and the flavor will be delicately sweet with a hint of vanilla, far superior to anything you could buy. This fresh, versatile topping is now ready to enhance your favorite desserts, hot drinks, or simply be enjoyed by the spoonful!
The Sweet Conclusion: Homemade Whipped Cream
Learning how to make whipped cream from scratch is a fundamental skill that opens up a world of delicious possibilities. It’s a simple process that yields incredible rewards: a fresh, fluffy, and flavorful topping that elevates any culinary creation. By starting with cold ingredients and tools, gradually whipping, and knowing when to stop, you can achieve perfect results every time. Remember these tips to avoid common pitfalls, and soon you’ll be effortlessly whipping up batches of this delightful dairy delight. Enjoy the superior taste and texture that only homemade can offer!